News & Articles
Courtline Tutorial - Adding or Removing TFF sessions from your calendar
Updating your TFF Site's session calendar is an important admin process for your site. Here's a step by step guide to achieving just that:
Step 1 - LOG IN as your Super-Admin account on your own Courtline installation
First off, you'll need to login as Super-Admin. If you want to delegate the job, they'll need to be Super-Admin level too. Alternatively, you can set another person as 'Admin' user level with permissions set to allow them to access 'Modules' and 'What's On' or 'Events' module. Contact us if you're wanting this option but aren't sure how to set these permissions.
STEP 2 - Go to Admin Panel and Select the Events Module
Once logged in as Super-Admin, click the 'Admin Panel' link in top right corner. You'll then be inside the Admin Panel. Now, click the 'Modules' link in left vertical menu. You'll then see a list of modules with an option to 'edit' or 'configure' each module from an icon representing 'edit' and an icon representing 'configure'. Look for the Events module, which depending on when your Courtline site was set up, could be called either: 'What's On' , 'Events' or 'Booking Calendar'. Check the module list for these names and you'll find that there's one of them in the list (note: there maybe more than one page to scroll through). Once you've found the module, click the 'configure' icon (represented by a cog/gear icon).
STEP 3 - Add more dates to the Calendar
You're now in the Events Module and if there are future dates still in your calendar, you'll see the 'Tennis For Free' event listed here. If you've run out of dates on your Tennis For Free session, then you won't see the Tennis For Free event in the calendar, instead you'll need to select the 'View Past Events' from the dropdown menu. You can now 'edit' the Tennis For Free event from the Past Events list.
Here's an example:
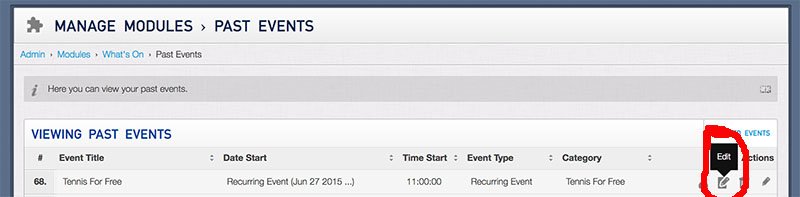
From viewing the Events Module (called 'What's On' in this case), there isn't a Tennis For Free session listed. Click the configure cog/gear and select the 'View Past Events'
You can now see the Tennis For Free event from the list (from the Past Events page) as show below. Click 'edit' icon.
STEP 4 - Add additional dates or remove existing dates from the Calendar
The resulting page (after clicking 'edit') will be the page where you can edit the details of your event. In the case of simply adding or removing dates on the calendar, just scroll down the the calendar section and just click all of the dates that you want the event to run on.
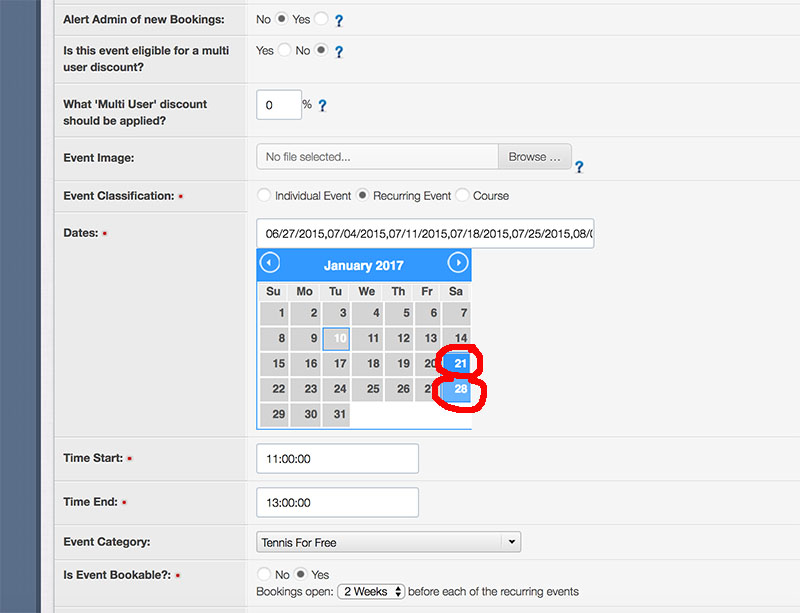
As an example, if you're running a TFF session on a Saturday morning 10am-12pm and are editing the calendar to add additional dates, you simply just click all of the Saturdays that you want to include on the calendar. Here's an example below, where the red circles are the admin user simply clicking additional Saturdays on the calendar:
Removing dates is the same kind of process. In this case, simply click an already clicked/highlighted date cell, this will un-select it and this date will then not appear as a date for the event. This is particularly useful if you've blanket booked out the TFF sessions for a full year and later decide that you're not going to run as many dates as originally anticipated.
Step 5 - Check on the Front-end that everything is how you want it
In theory, that's it!! You've edited your calendar but it's worth double checking everything is as you intended it. Check the TFF book widget (on the homepage) is showing dates again and that the calendar page on your website is showing the edited dates.
Step 1 - LOG IN as your Super-Admin account on your own Courtline installation
First off, you'll need to login as Super-Admin. If you want to delegate the job, they'll need to be Super-Admin level too. Alternatively, you can set another person as 'Admin' user level with permissions set to allow them to access 'Modules' and 'What's On' or 'Events' module. Contact us if you're wanting this option but aren't sure how to set these permissions.
STEP 2 - Go to Admin Panel and Select the Events Module
Once logged in as Super-Admin, click the 'Admin Panel' link in top right corner. You'll then be inside the Admin Panel. Now, click the 'Modules' link in left vertical menu. You'll then see a list of modules with an option to 'edit' or 'configure' each module from an icon representing 'edit' and an icon representing 'configure'. Look for the Events module, which depending on when your Courtline site was set up, could be called either: 'What's On' , 'Events' or 'Booking Calendar'. Check the module list for these names and you'll find that there's one of them in the list (note: there maybe more than one page to scroll through). Once you've found the module, click the 'configure' icon (represented by a cog/gear icon).
STEP 3 - Add more dates to the Calendar
You're now in the Events Module and if there are future dates still in your calendar, you'll see the 'Tennis For Free' event listed here. If you've run out of dates on your Tennis For Free session, then you won't see the Tennis For Free event in the calendar, instead you'll need to select the 'View Past Events' from the dropdown menu. You can now 'edit' the Tennis For Free event from the Past Events list.
Here's an example:
From viewing the Events Module (called 'What's On' in this case), there isn't a Tennis For Free session listed. Click the configure cog/gear and select the 'View Past Events'
You can now see the Tennis For Free event from the list (from the Past Events page) as show below. Click 'edit' icon.
STEP 4 - Add additional dates or remove existing dates from the Calendar
The resulting page (after clicking 'edit') will be the page where you can edit the details of your event. In the case of simply adding or removing dates on the calendar, just scroll down the the calendar section and just click all of the dates that you want the event to run on.
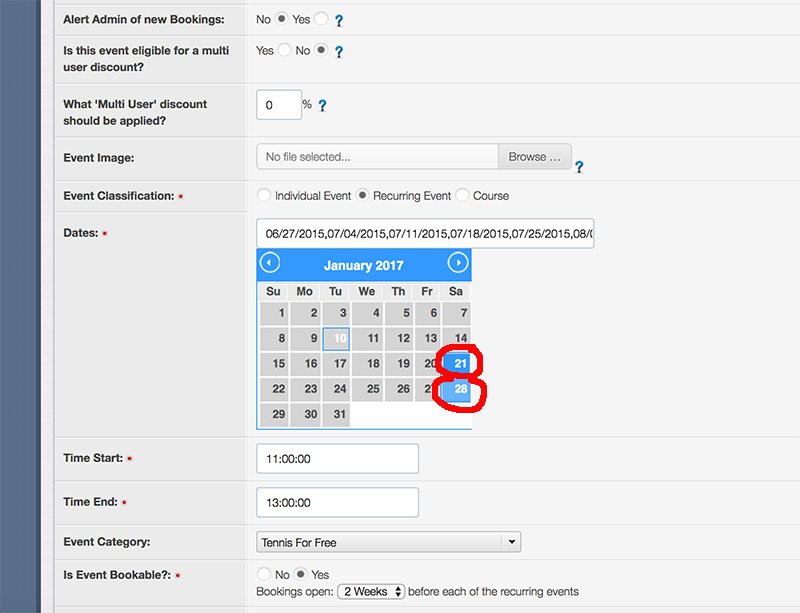
As an example, if you're running a TFF session on a Saturday morning 10am-12pm and are editing the calendar to add additional dates, you simply just click all of the Saturdays that you want to include on the calendar. Here's an example below, where the red circles are the admin user simply clicking additional Saturdays on the calendar:
Removing dates is the same kind of process. In this case, simply click an already clicked/highlighted date cell, this will un-select it and this date will then not appear as a date for the event. This is particularly useful if you've blanket booked out the TFF sessions for a full year and later decide that you're not going to run as many dates as originally anticipated.
Step 5 - Check on the Front-end that everything is how you want it
In theory, that's it!! You've edited your calendar but it's worth double checking everything is as you intended it. Check the TFF book widget (on the homepage) is showing dates again and that the calendar page on your website is showing the edited dates.